go打包aar及flutter调用aar流程是什么
一、目的
使用flutter加载与调用第三方aar包。
二、背景
go可以编译为第三方平台的可执行程序,而flutter可以是一个用于开发跨平台UI的工具,如果开发一个程序,go用于后台服务,flutter只用于描绘UI,是否可以做到。
查询了下github上的开源项目,有几个类似的:
思源:使用go与安卓/IOS嵌入js
Appflowy: 使用rust与flutter
rustdesk: 使用rust与flutter
上述三个,大致都是将flutter做为一个跨平台的UI工具来进行使用(思源不是flutter),然后使用第三方语言实现基本业务逻辑。
三、流程
问题:
go如何打包为移动端的包
flutter如何调用该包
问题一:go如何打包为移动端的包
1.环境配置
第一步需要解决的是环境配置,想打包安卓的包,肯定需要安卓的工具。
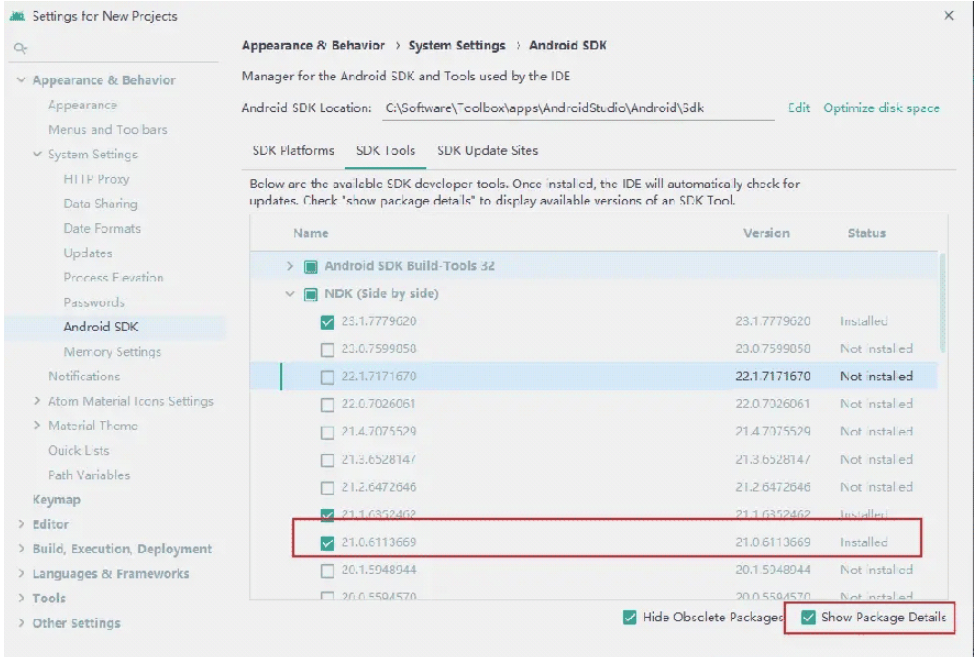
下载android studio
打开SDK Tools 工具库,安装NDK,请务必安装该版本:21.0.6113669
NDK解释:
Native Development Kit,是Android的一个工具开发包快速开发
C、C++的动态库,并自动将so和应用一起打包成APK,即可通过NDK在Android中 使用JNI与本地代码(如C、C++)交互
踩坑:默认安装是23最高版本,打包失败,请勾选show package details,会展开更加详细的NDK版本,务必下载21.0.6113669 版本!!!
2.go配置与打包
golang.org/x/mobile/cmd/gomobile
在项目中执行命令:
go build golang.org/x/mobile/cmd/gomobile
gomobile init
使用gomobile库可以将go程序打包为移动端的包
本项目程序截图:
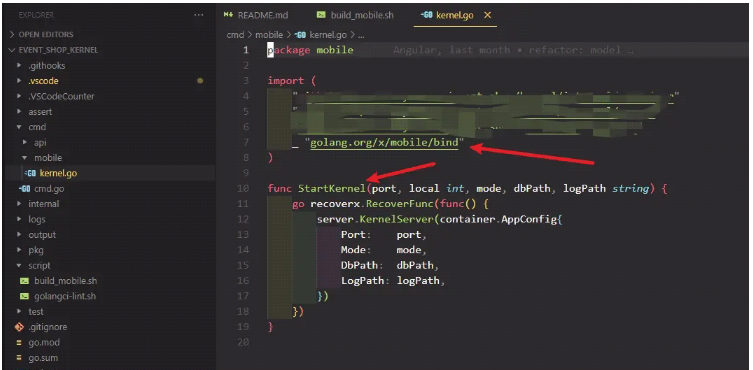
在cmd/mobile中有一个kernel.go文件,该文件就是提供给移动端方法调用的入口StartKernel,里面是启动一个协程,该协程中会启动对应的http服务。
在我本地,我增加了一个构建安卓aar包的脚本
#!/usr/bin/env bash
# 构建移动端脚本
CRTDIR=$(pwd)
# 判断是否有output文件夹
if [ ! -d "${CRTDIR}/output" ]; then
  mkdir ${CRTDIR}/output
fi
# gomobile bind [-target android|ios|iossimulator|macos|maccatalyst] [-bootclasspath <path>] [-classpath <path>] [-o output] [build flags] [package]
# gomobile bind ./kernel/
gomobile bind -target=android -o=./output/mobile.aar -ldflags '-s -w'  ./cmd/mobile
执行该脚本,本地output会生成两文件:
mobile-sources.jar -- 具体实现的可以看该包,内部提供了一些静态本地方法
mobile.aar -- 我们真正需要的包
mobile-sources.jar内容:
// Code generated by gobind. DO NOT EDIT.
// Java class mobile.Mobile is a proxy for talking to a Go program.
//
//   autogenerated by gobind -lang=java github.com/clz.skywalker/event.shop/kernal/cmd/mobile
package mobile;
import go.Seq;
public abstract class Mobile {
	static {
		Seq.touch(); // for loading the native library
		_init();
	}
	private Mobile() {} // uninstantiable
	// touch is called from other bound packages to initialize this package
	public static void touch() {}
	private static native void _init();
	public static native void startKernel(long port, long local, String mode, String dbPath, String logPath);
}
好了,现在我们已经拿到了aar包了。
问题二:flutter如何调用aar
找半天文章,没有看到flutter直接调用aar包,如果你找到了请告诉我。
我现在的解决方案是参考官网的:用写插件的方式去实现,安卓加载aar,然后flutter再调用。
第一步:存放aar与修改gradle配置
在android文件夹下的app/libs 中放入mobile.aar文件,如果没有libs文件夹的话就创一个。
编辑app/build.gradle文件,增加如下代码:
dependencies {
    // implementation "org.jetbrains.kotlin:kotlin-stdlib-jdk7:$kotlin_version"
    // implementation fileTree(dir: 'libs', include: ['*.jar', '*.aar'])
    // implementation files('libs/kernel.aar')
    implementation(name:'mobile',ext:'aar')
}
注释的是本人尝试后有问题的使用方式,本人非安卓开发人员,不是很清楚为什么不能那么使用,如果你知道的话可以告诉下我,没有注释的是本人亲试没问题的加载方式。

第二步:修改MainActivity.java入口代码
参考该文章,实现 configureFlutterEngine 方法,通过向 configureFlutterEngine 注册方法,可以实现调用native的方法。
MethodChannel的名字与flutter代码约定好,必须一模一样。
package github.com/ClzSkywalker;
import android.content.Intent;
import android.os.Bundle;
import androidx.annotation.NonNull;
import java.util.Objects;
import io.flutter.plugin.common.MethodChannel;
import io.flutter.embedding.android.FlutterActivity;
import io.flutter.embedding.engine.FlutterEngine;
import io.flutter.plugins.GeneratedPluginRegistrant;
// 引入go打包的aar库
import mobile.Mobile;
public class MainActivity extends FlutterActivity {
    // 约定通道的名称,flutter可以通过通道名调用对应的方法
    private static final String CHANNEL = "kernel.startKernel";
    private static boolean kernelIsRunning = false;
    @Override
    public void configureFlutterEngine(@NonNull FlutterEngine flutterEngine) {
      GeneratedPluginRegistrant.registerWith(flutterEngine);
      new MethodChannel(flutterEngine.getDartExecutor().getBinaryMessenger(), CHANNEL)
              .setMethodCallHandler(
                      (call, result) -> {
                          if (call.method.contentEquals("startKernel")) {
                            if (kernelIsRunning) {
                              result.success("");
                              return;
                            }
                            long port= Long.parseLong(Objects.requireNonNull(call.argument("port")).toString());
                              long local= Long.parseLong(Objects.requireNonNull(call.argument("local")).toString());
                              String mode= Objects.requireNonNull(call.argument("mode")).toString();
                              String dbPath= Objects.requireNonNull(call.argument("dbPath")).toString();
                              String logPath= Objects.requireNonNull(call.argument("logPath")).toString();
                              new Thread(() -> {
                                  // 调用aar中的方法
                                  Mobile.startKernel(port,local,mode,dbPath,logPath);
                              }).start();
                            kernelIsRunning=true;
                            result.success("");
                          }else{
                              result.notImplemented();
                          }
                      }
              );
  }
}
第三步:flutter调用
简短写一下,调用还是挺简单的,MethodChannel("name"),name的名字必须要与java中约定的通道名称一致。
    static const channel = MethodChannel('kernel.startKernel');
    kernelMap['port'] = 4935;
    kernelMap['local'] = 0;
    if (kDebugMode) {
      kernelMap['mode'] = 'test';
    } else {
      kernelMap['mode'] = 'release';
    }
    kernelMap['dbPath'] = dirPath;
    kernelMap['logPath'] = logPath.path;
    await channel.invokeMethod<void>('startKernel', kernelMap);