pytorch如何实现模型剪枝
一,剪枝分类
所谓模型剪枝,其实是一种从神经网络中移除"不必要"权重或偏差(weigths/bias)的模型压缩技术。关于什么参数才是“不必要的”,这是一个目前依然在研究的领域。
1.1,非结构化剪枝
非结构化剪枝(Unstructured Puning)是指修剪参数的单个元素,比如全连接层中的单个权重、卷积层中的单个卷积核参数元素或者自定义层中的浮点数(scaling floats)。其重点在于,剪枝权重对象是随机的,没有特定结构,因此被称为非结构化剪枝。
1.2,结构化剪枝
与非结构化剪枝相反,结构化剪枝会剪枝整个参数结构。比如,丢弃整行或整列的权重,或者在卷积层中丢弃整个过滤器(Filter)。
1.3,本地与全局修剪
剪枝可以在每层(局部)或多层/所有层(全局)上进行。
二,PyTorch 的剪枝
目前 PyTorch 框架支持的权重剪枝方法有:
Random: 简单地修剪随机参数。
Magnitude: 修剪权重最小的参数(例如它们的 L2 范数)
以上两种方法实现简单、计算容易,且可以在没有任何数据的情况下应用。
2.1,pytorch 剪枝工作原理
剪枝功能在 torch.nn.utils.prune 类中实现,代码在文件 torch/nn/utils/prune.py 中,主要剪枝类如下图所示。

剪枝原理是基于张量(Tensor)的掩码(Mask)实现。掩码是一个与张量形状相同的布尔类型的张量,掩码的值为 True 表示相应位置的权重需要保留,掩码的值为 False 表示相应位置的权重可以被删除。
Pytorch 将原始参数 复制到名为 _original 的参数中,并创建一个缓冲区来存储剪枝掩码 _mask。同时,其也会创建一个模块级的 forward_pre_hook 回调函数(在模型前向传播之前会被调用的回调函数),将剪枝掩码应用于原始权重。
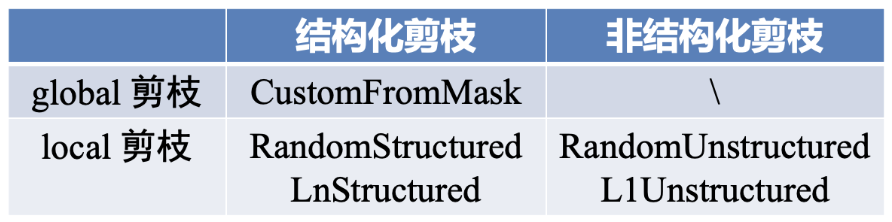
pytorch 剪枝的 api 和教程比较混乱,我个人将做了如下表格,希望能将 api 和剪枝方法及分类总结好。
pytorch 中进行模型剪枝的工作流程如下:
选择剪枝方法(或者子类化 BasePruningMethod 实现自己的剪枝方法)。
指定剪枝模块和参数名称。
设置剪枝方法的参数,比如剪枝比例等。
2.2,局部剪枝
Pytorch 框架中的局部剪枝有非结构化和结构化剪枝两种类型,值得注意的是结构化剪枝只支持局部不支持全局。
2.2.1,局部非结构化剪枝
1,局部非结构化剪枝(Locall Unstructured Pruning)对应函数原型如下:
def random_unstructured(module, name, amount)
1,函数功能:
用于对权重参数张量进行非结构化剪枝。该方法会在张量中随机选择一些权重或连接进行剪枝,剪枝率由用户指定。
2,函数参数定义:
module(nn.Module): 需要剪枝的网络层/模块,例如 nn.Conv2d() 和 nn.Linear()。name(str): 要剪枝的参数名称,比如 "weight" 或 "bias"。amount(int or float): 指定要剪枝的数量,如果是 0~1 之间的小数,则表示剪枝比例;如果是证书,则直接剪去参数的绝对数量。比如amount=0.2,表示将随机选择 20% 的元素进行剪枝。
3,下面是 random_unstructured 函数的使用示例。
import torch
import torch.nn.utils.prune as prune
conv = torch.nn.Conv2d(1, 1, 4)
prune.random_unstructured(conv, name="weight", amount=0.5)
conv.weight
"""
tensor([[[[-0.1703,  0.0000, -0.0000,  0.0690],
          [ 0.1411,  0.0000, -0.0000, -0.1031],
          [-0.0527,  0.0000,  0.0640,  0.1666],
          [ 0.0000, -0.0000, -0.0000,  0.2281]]]], grad_fn=)
"""
可以看书输出的 conv 层中权重值有一半比例为 0。
2.2.2,局部结构化剪枝
局部结构化剪枝(Locall Structured Pruning)有两种函数,对应函数原型如下:
def random_structured(module, name, amount, dim)
def ln_structured(module, name, amount, n, dim, importance_scores=None)
1,函数功能
与非结构化移除的是连接权重不同,结构化剪枝移除的是整个通道权重。
2,参数定义
与局部非结构化函数非常相似,唯一的区别是您必须定义 dim 参数(ln_structured 函数多了 n 参数)。
n 表示剪枝的范数,dim 表示剪枝的维度。
对于 torch.nn.Linear:
dim = 0: 移除一个神经元。dim = 1:移除与一个输入的所有连接。
对于 torch.nn.Conv2d:
dim = 0(Channels) : 通道 channels 剪枝/过滤器 filters 剪枝dim = 1(Neurons): 二维卷积核 kernel 剪枝,即与输入通道相连接的 kernel
2.2.3,局部结构化剪枝示例代码
在写示例代码之前,我们先需要理解 Conv2d 函数参数、卷积核 shape、轴以及张量的关系。
首先,Conv2d 函数原型如下;
class torch.nn.Conv2d(in_channels, out_channels, kernel_size, stride=1, padding=0, dilation=1, groups=1, bias=True)
而 pytorch 中常规卷积的卷积核权重 shape 都为(C_out, C_in, kernel_height, kernel_width),所以在代码中卷积层权重 shape 为 [3, 2, 3, 3],dim = 0 对应的是 shape [3, 2, 3, 3] 中的 3。这里我们 dim 设定了哪个轴,那自然剪枝之后权重张量对应的轴机会发生变换。
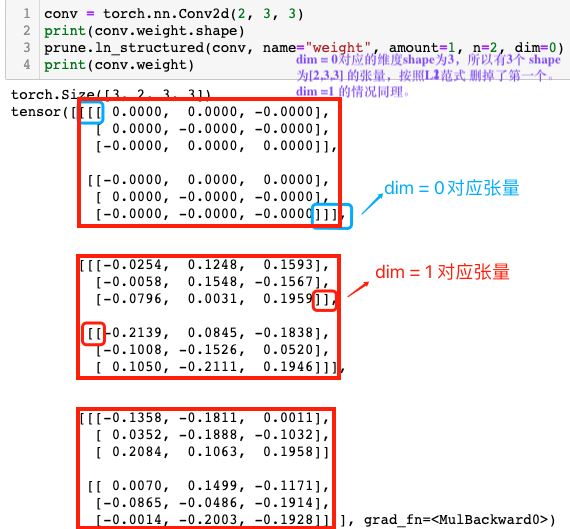
理解了前面的关键概念,下面就可以实际使用了,dim=0 的示例如下所示。
conv = torch.nn.Conv2d(2, 3, 3) norm1 = torch.norm(conv.weight, p=1, dim=[1,2,3]) print(norm1) """ tensor([1.9384, 2.3780, 1.8638], grad_fn=) """ prune.ln_structured(conv, name="weight", amount=1, n=2, dim=0) print(conv.weight) """ tensor([[[[-0.0005, 0.1039, 0.0306], [ 0.1233, 0.1517, 0.0628], [ 0.1075, -0.0606, 0.1140]], [[ 0.2263, -0.0199, 0.1275], [-0.0455, -0.0639, -0.2153], [ 0.1587, -0.1928, 0.1338]]], [[[-0.2023, 0.0012, 0.1617], [-0.1089, 0.2102, -0.2222], [ 0.0645, -0.2333, -0.1211]], [[ 0.2138, -0.0325, 0.0246], [-0.0507, 0.1812, -0.2268], [-0.1902, 0.0798, 0.0531]]], [[[ 0.0000, -0.0000, -0.0000], [ 0.0000, -0.0000, -0.0000], [ 0.0000, -0.0000, 0.0000]], [[ 0.0000, 0.0000, 0.0000], [-0.0000, 0.0000, 0.0000], [-0.0000, -0.0000, -0.0000]]]], grad_fn= ) """
从运行结果可以明显看出,卷积层参数的最后一个通道参数张量被移除了(为 0 张量),其解释参见下图。
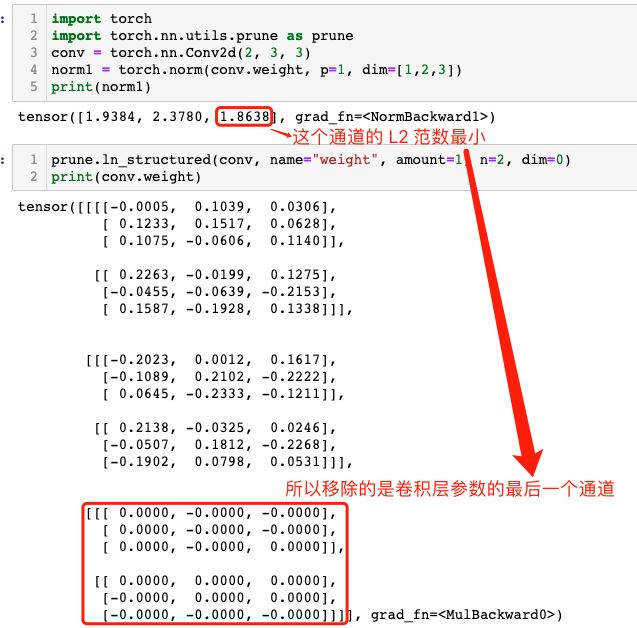
dim = 1 的情况:
conv = torch.nn.Conv2d(2, 3, 3) norm1 = torch.norm(conv.weight, p=1, dim=[0, 2,3]) print(norm1) """ tensor([3.1487, 3.9088], grad_fn=) """ prune.ln_structured(conv, name="weight", amount=1, n=2, dim=1) print(conv.weight) """ tensor([[[[ 0.0000, -0.0000, -0.0000], [-0.0000, 0.0000, 0.0000], [-0.0000, 0.0000, -0.0000]], [[-0.2140, 0.1038, 0.1660], [ 0.1265, -0.1650, -0.2183], [-0.0680, 0.2280, 0.2128]]], [[[-0.0000, 0.0000, 0.0000], [ 0.0000, 0.0000, -0.0000], [-0.0000, -0.0000, -0.0000]], [[-0.2087, 0.1275, 0.0228], [-0.1888, -0.1345, 0.1826], [-0.2312, -0.1456, -0.1085]]], [[[-0.0000, 0.0000, 0.0000], [ 0.0000, -0.0000, 0.0000], [ 0.0000, -0.0000, 0.0000]], [[-0.0891, 0.0946, -0.1724], [-0.2068, 0.0823, 0.0272], [-0.2256, -0.1260, -0.0323]]]], grad_fn= ) """
很明显,对于 dim=1的维度,其第一个张量的 L2 范数更小,所以shape 为 [2, 3, 3] 的张量中,第一个 [3, 3] 张量参数会被移除(即张量为 0 矩阵) 。
2.3,全局非结构化剪枝
前文的 local 剪枝的对象是特定网络层,而 global 剪枝是将模型看作一个整体去移除指定比例(数量)的参数,同时 global 剪枝结果会导致模型中每层的稀疏比例是不一样的。
全局非结构化剪枝函数原型如下:
# v1.4.0 版本
def global_unstructured(parameters, pruning_method, **kwargs)
# v2.0.0-rc2版本
def global_unstructured(parameters, pruning_method, importance_scores=None, **kwargs):
1,函数功能:
随机选择全局所有参数(包括权重和偏置)的一部分进行剪枝,而不管它们属于哪个层。
2,参数定义:
parameters((Iterable of (module, name) tuples)): 修剪模型的参数列表,列表中的元素是 (module, name)。pruning_method(function): 目前好像官方只支持 pruning_method=prune.L1Unstuctured,另外也可以是自己实现的非结构化剪枝方法函数。importance_scores: 表示每个参数的重要性得分,如果为 None,则使用默认得分。**kwargs: 表示传递给特定剪枝方法的额外参数。比如amount指定要剪枝的数量。
3,global_unstructured 函数的示例代码如下所示。
device = torch.device("cuda" if torch.cuda.is_available() else "cpu")

class LeNet(nn.Module):
    def __init__(self):
        super(LeNet, self).__init__()
        # 1 input image channel, 6 output channels, 3x3 square conv kernel
        self.conv1 = nn.Conv2d(1, 6, 3)
        self.conv2 = nn.Conv2d(6, 16, 3)
        self.fc1 = nn.Linear(16 * 5 * 5, 120)  # 5x5 image dimension
        self.fc2 = nn.Linear(120, 84)
        self.fc3 = nn.Linear(84, 10)

    def forward(self, x):
        x = F.max_pool2d(F.relu(self.conv1(x)), (2, 2))
        x = F.max_pool2d(F.relu(self.conv2(x)), 2)
        x = x.view(-1, int(x.nelement() / x.shape[0]))
        x = F.relu(self.fc1(x))
        x = F.relu(self.fc2(x))
        x = self.fc3(x)
        return x

model = LeNet().to(device=device)

model = LeNet()

parameters_to_prune = (
    (model.conv1, 'weight'),
    (model.conv2, 'weight'),
    (model.fc1, 'weight'),
    (model.fc2, 'weight'),
    (model.fc3, 'weight'),
)

prune.global_unstructured(
    parameters_to_prune,
    pruning_method=prune.L1Unstructured,
    amount=0.2,
)
# 计算卷积层和整个模型的稀疏度
# 其实调用的是 Tensor.numel 内内函数,返回输入张量中元素的总数
print(
    "Sparsity in conv1.weight: {:.2f}%".format(
        100. * float(torch.sum(model.conv1.weight == 0))
        / float(model.conv1.weight.nelement())
    )
)
print(
    "Global sparsity: {:.2f}%".format(
        100. * float(
            torch.sum(model.conv1.weight == 0)
            + torch.sum(model.conv2.weight == 0)
            + torch.sum(model.fc1.weight == 0)
            + torch.sum(model.fc2.weight == 0)
            + torch.sum(model.fc3.weight == 0)
        )
        / float(
            model.conv1.weight.nelement()
            + model.conv2.weight.nelement()
            + model.fc1.weight.nelement()
            + model.fc2.weight.nelement()
            + model.fc3.weight.nelement()
        )
    )
)
# 程序运行结果
"""
Sparsity in conv1.weight: 3.70%
Global sparsity: 20.00%
"""
运行结果表明,虽然模型整体(全局)的稀疏度是 20%,但每个网络层的稀疏度不一定是 20%。