JavaScript如何实现封装一个快速生成目录树的全局脚本
说在前面
思路分析
首先我们需要先明确一下我们这个工具需要实现的功能:
1、可以生成指定目录的文件树文件
2、可以方便地在任意目录下生成
那么我们需要做的也就是以下两步:
1、编写一个可以生成指定目录文件树的文件
2、将脚本封装成全局脚本
为了方便插件的使用、提高用户体验,我们可以使用命令行交互的方式来获取所需参数。
功能实现
一、使用命令行交互来获取所需参数
编写脚本之前我们需要先明确一下需要的参数
1、需要生成文件树的根目录路径;
2、生成过程中需要忽略的文件或目录;
3、生成文件树的深度;
4、生成的文件树文件存放路径;
这里使用到了我自己之前基于inquirer进行二次封装的@jyeontu/j-inquirer,与inquirer相比,@jyeontu/j-inquirer增加了文件夹选择器的交互方式,我们可以直接使用其来选择需要生产目录树的文件目录和生成文件存放的位置。
const JInquirer = require("@jyeontu/j-inquirer");
const fs = require("fs");
const path = require("path");

async init() {
    const options = this.getOptions();
    let j = new JInquirer(options);
    let res = await j.prompt();
    this.config = res;
    this.generateTree(res);
}
getOptions() {
    const basePath = this.config.basePath || __dirname;
    return [
      {
        type: "folder",
        message: "请选择文件夹:",
        name: "basepath",
        default: "",
        pathType: "absolute",
        dirname: basePath,
      },
      {
        type: "input",
        message: "请输入需要过滤的文件名(英文逗号隔开):",
        name: "filterFile",
        notNull: false,
      },
      {
        type: "input",
        message: "请输入需要遍历的层数:",
        name: "stopFloor",
        notNull: false,
      },
      {
        type: "folder",
        message: "请选择生成文件存放位置:",
        name: "generatePath",
        default: "",
        pathType: "absolute",
        dirname: basePath,
      },
    ];
  }
获取到我们需要的参数之后我们便可以开始编写生成文件目录树的代码了:
二、编写目录文件树生成逻辑
1、递归获取文件目录
递归结束条件为传入参数的最大遍历深度:if (floor > stopFloor) return;。
通过readdirSync可以获取指定目录下的所有文件列表,通过statSync方法获取文件属性,再通过isFile方法判断是文件还是目录,如果当前遍历到的为目录,则需要递归遍历该目录下的所有文件……
processDir(dirPath, dirTree = [], floor = 1) {
    const { stopFloor } = this.config;
    if (floor > stopFloor) return;
    let list = fs.readdirSync(dirPath);
    list = list.filter((item) => {
      return !this.isFilterPath(item);
    });
    list.forEach((itemPath) => {
      const fullPath = path.join(dirPath, itemPath);
      const fileStat = fs.statSync(fullPath);
      const isFile = fileStat.isFile();
      const dir = {
        name: itemPath,
      };
      if (!isFile) {
        dir.children = this.processDir(fullPath, [], floor + 1);
      }
      dirTree.push(dir);
    });
    return dirTree;
  }
2、过滤不需要的文件
有时候我们不希望打印出某些文件目录(如:node_modules),我们在输入配置的时候可以进行设置,遍历文件目录的过程中会过滤掉相关的文件。
isFilterPath(item) {
  let { filterFile } = this.config;
  filterFile = filterFile.split(",");
  for (let i = 0; i < filterFile.length; i++) {
    let reg = filterFile[i];
    if (item.match(reg) && item.match(reg)[0] === item) return true;
  }
  return false;
}
3、将文件树列表转换为字符串
前面我们生成的文件树是以列表的形式保存,现在我们需要将其转换成使用制表符连接的字符串的格式。
consoleTree(tree, floor = 1, str = "", adder = "───", isLast = false) {
  str += adder;
  for (let i = 0; i < tree.length; i++) {
    if (floor === 1 && i === 0) {
      this.fileTree += "n" + "┌" + str + tree[i].name;
    } else if (
      (isLast || floor === 1) &&
      i === tree.length - 1 &&
      !tree[i].children
    ) {
      this.fileTree += "n" + "└" + str + tree[i].name;
    } else {
      this.fileTree += "n" + "├" + str + tree[i].name;
    }
    if (tree[i].children)
      this.consoleTree(
        tree[i].children,
        floor + 1,
        str,
        adder,
        (isLast || floor === 1) && i === tree.length - 1
      );
  }
}
4、将生成的目录树写入 txt 文件
前面我们已经生成了字符串格式的目录树,所以我们可以直接将生成的字符串写入 txt 文件即可,注意写入前我们需要先将原有内容情况。
writeTree(filePath, content) {
  this.clearTxt(filePath);
  fs.writeFileSync(filePath, `${content}`);
}
clearTxt(filePath) {
  this.fileTree = "";
  fs.writeFileSync(filePath, "");
}
三、封装成全局插件
1、准备一个脚本文件
创建一个文件 bin.js 作为启动脚本。
#!/usr/bin/env node

const path = require("path");
const GetFileTree = require("./GetFileTree.js");
const basePath = process.argv[2] || path.join(process.argv[1], "../");
console.log(process.argv, basePath);
const gft = new GetFileTree({ basePath });
gft.init();
2、package.json 中配置启动命令
在package.json文件中配置脚本启动命令,需要设置 bin 属性,这个配置帮助我们将包内的可执行脚本文件注入系统环境。多个命令时,支持对象配置命令:
{
  "name": "mt-cli",
  "version": "1.0.1",
  "bin": {
    "getFileTree": "./bin.js"
  }
}
3、上传到 npm
登录自己的 npm 账号后可以使用命令将该包上传到 npm 仓库。
npm publish
四、插件安装使用
1、插件安装
npm i -g getFileTree
2、插件使用
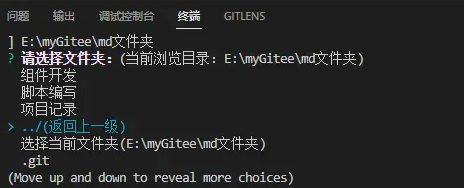
全局安装后我们就可以在任意目录下使用getFileTree 目录绝对路径命令来生成文件目录树,如下:
getFileTree E:myGiteemd文件夹
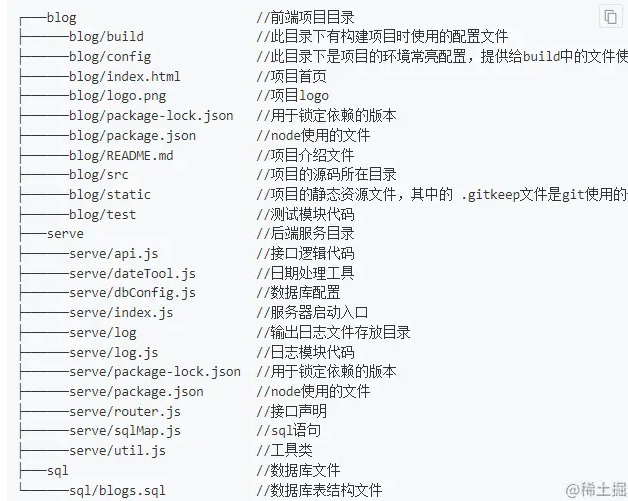
然后按照提示选择或输入相关的参数即可,生成的文件如下:
